Meal Prep Monday (02/06/2025)

I am inspired. One of my Facebook friends shares, it seems, everything that she makes for lunches and treats and dinners, and every single photo is terrible and unappetising. A page I follow, on the other hand, shares what she eats and what she makes for healthy everything, and everything looks fantastic and healthy and an Anna Thing To Eat. In my “I can do that, too” mentality, and with the amount of food prep that actually happens Friday-Sunday (usually), I now plan to do a roundup of that on Mondays for you. You’re welcome. Actually it’s also part of me reminding myself of achievements. If I feel like I’ve just been opening yoghurt pouches and doing the washing and chopping up oranges and doing the washing and separating squabbling children and doing the washing and sorting the washing and doing more washing, noting the other things really helps. Yes, I did all those other things too, but now I also have a record of the snacks and other things prepared. Lots of them include chocolate chips.

Friday normally gets me baking something but we had stuff to do so, no. Saturday morning, though, I baked sweet potato and apple oatmeal, sweet potato and banana chocolate chip bread, and “4 ingredient peanut butter banana bars”. That’s in quotes because, as is so often the case with recipes with a small number of ingredients, whoever did the recipe didn’t actually count. Out of bananas, peanut butter, vanilla, oats, salt, baking powder and chocolate chips, some of those are clearly more special than others. I am not, however, game to omit any. And also, I couldn’t find the silicone loaf pan I wanted so as the recipe makes 6-8 bars, I used a 6-hole silicone muffin pan and I will be making these again. New favourite, despite the lack of accountability (ha pun).

You may have noticed a theme with both bananas and sweet potato. We suddenly had a glut of 12 very ripe (black) bananas. Although I love Our Go-To Banana Bread, I had made it recently as bread and muffins and mini muffins and there was only so much I could take. With recent baking and Saturday’s baking, I cleared the build-up just in time for a fresh bunch to start going spotty. Good times. The sweet potato was from our farm box. Not the most recent one. The one a fortnight before that. I didn’t weigh it, but it was about the size of a toddler’s torso. Glenn used some in a couple of meals. I reserved some for baked oatmeal and then had enough to try this bread as well. The bread is fantastic and will be made again.

Less exciting meal prep but very necessary meal prep happens on Sunday evening. If we have eggs, I hard boil four of them. C and I both enjoy them during the day. Everyone else does, too, but E and S are not so adept at peeling or biting without the egg bouncing away. I also do a batch of overnight oats which will do me for three breakfasts. I did not do either of those things for a few weekends in a row and I was really feeling it. Mornings were a bit more rushed. Snacks were a little less varied and less protein-rich. I’m back on track now, though, and much relieved.

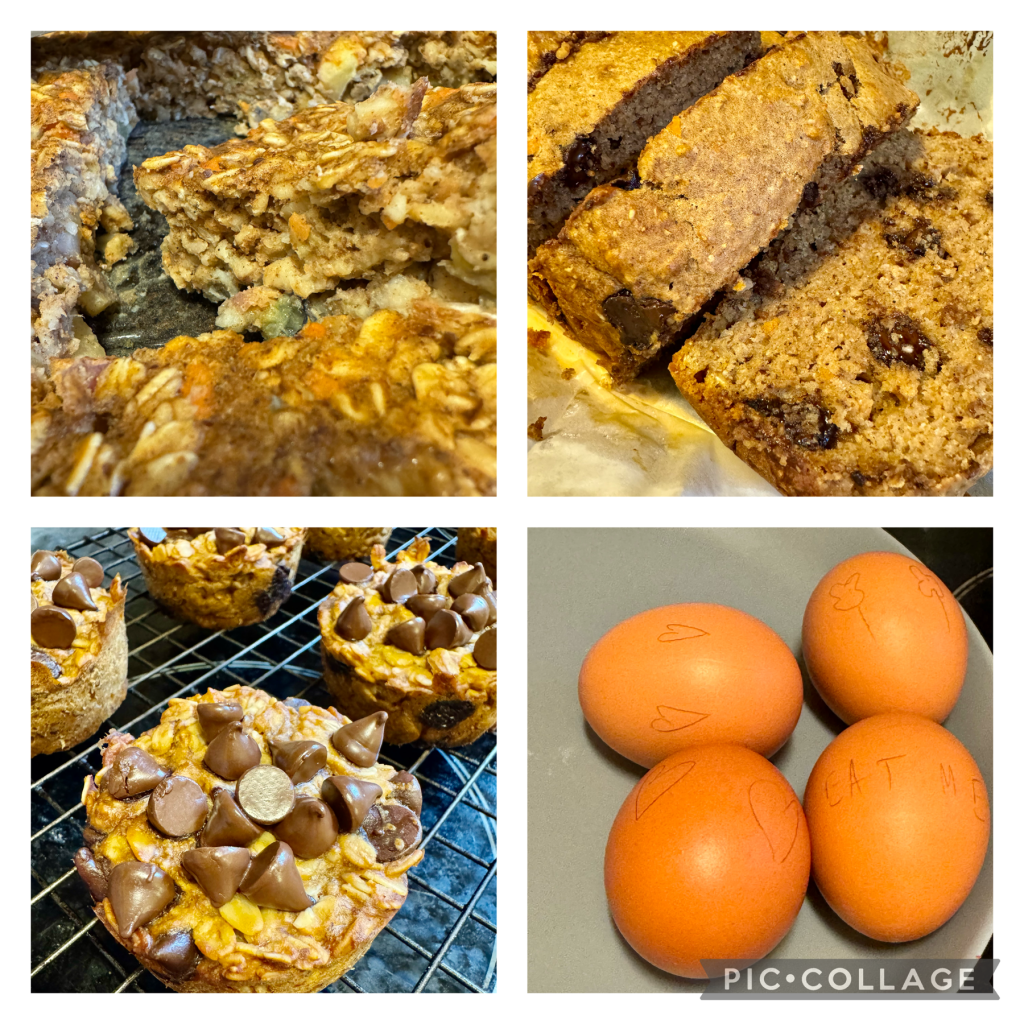
Top left: Sweet potato and apple baked oatmeal https://thenaturalnurturer.com/baked-apple-sweet-potato-oatmeal/

Top right: Sweet potato and banana bread https://thenaturalnurturer.com/sweet-potato-banana-bread/

Bottom left: “4 ingredient peanut butter banana bars” https://sammibrondo.com/peanut-butter-banana-bars/

Bottom right: hard boiled eggs. I draw on them so we know they’re boiled and not not-boiled. I am not good at drawing flowers.

Baking the Best Ever Chocolate Chip Cookies

Are you ready to make the best chocolate chip cookies you have ever made? Of course you are. Here we go.

Start this recipe as far in advance as you can. “Ready in less than an hour” does not apply here.

Gather your supplies. You will need:

2 cups of wholemeal plain flour (white plain flour works fine here too)

1 teaspoon baking powder

3/4 teaspoon bicarb soda

1 1/4 cups chocolate chips – vegan if necessary 

2/3 cup coconut sugar (or 1/2 cup packed brown sugar)

1/2 cup granulated or caster sugar

1/2 cup plus 1 teaspoon olive oil or coconut oil

1/4 cup plus 1 teaspoon water

Plus: 2 mixing bowls – 1 medium and 1 large; and measuring cups and spoons.

As you gather your supplies, children gather nearby, realising that baking is imminent. They clamour for the ladder which is allocated on a first come, first served basis. Second child gets to fetch the step stool from the bathroom. Third child is reminded how tall they are and actually don’t really need height assistance.

Start measuring your 2 cups of wholemeal flour into a medium bowl. A child will insist on doing this with you. The pride you feel when they tell you any of the numbers they see on the measuring cups is soon overridden by the spray of flour as they tip it only partially into the bowl. 

Don’t stress it. Somehow this process makes it better. I don’t know how.

A teaspoon of baking powder and a very approximate 3/4 teaspoon of bicarb soda go in too. Children take turns to stir, sometimes remembering to hold the bowl. Some more flour mix may be launched out of the bowl. This is fine. We are fine.

Next come the chocolate chips, and relief. 1 1/4 cups of chocolate chips need to go into the flour mix. This is more than a standard pack of chocolate chips so don’t be complacent. Your helpers are at the height of helpfulness when testing of the chocolate chips is underway. Often this is their cue to leave you to yourself to get on with things, if they score enough of a batch to test for quality. Or to see if they prefer milk or dark. This is all important. Embrace it.

Next, bring out the large mixing bowl. Put the medium bowl out of reach of children. The chocolate chips are still visible in this mix so are at risk of further testing.

Into this bowl you will need 2/3 cup of coconut sugar (or 1/2 cup packed brown sugar which will end up thoroughly tested and quite spilled and therefore further tested); 1/2 cup of caster sugar; 1/2 cup plus an extra teaspoon of olive oil (or coconut oil but I personally can’t stand the scent so steer clear); and 1/4 cup plus 1 teaspoon of water. Mix this vigorously. I prefer using a fork for this but I realise most people are fancy and use a whisk. 

When the mix is, you know, mixed, add the flour mix to the wet mix and stir with a wooden spoon. Mix just enough for there to be no more clumps of unmixed flour. 

If you are baking these anywhere from October to April in Brisbane, you will probably need to put the bowl in the fridge now otherwise your cookies will become one. 15 minutes or so should do it, or as long as you need to deal with having a cheeky nap or changing a toddler nappy or putting out washing or if you just forget. It’s fine. 

Get 2 baking trays and line them as you usually line them. Bring out the cookie dough and, if you’re feeling generous, let the helpers know you’re up to the next stage. Clean hands. Rings off. I make a line across the middle of the dough so I can keep track of how much for each tray, and then scoop a spoonful of dough into my hands to roll into a ball then onto a tray. Depending on the capabilities of the helper, they may need some guidance in the amount of dough to use, but I find if they have enough play dough experience they will catch on pretty quickly and not need help in rolling it into a ball. No need to stress if they taste test the dough. No egg, no worries. Winning. This batch makes 26 cookies which suits my preferred layout of 3-2-3-2-3 on each tray. Do a little squish on each dough ball, using cute little helping fingers or a fork. 

Chill time is essential. If you can find room in your freezer for these two trays, good for you. Whack them in for 30 minutes. Otherwise, into the fridge for … some time. Like, at least four hours. I usually leave them until the next morning, but whatever works. When you remember them, turn on your oven to 175C. If you get your cookies out when you turn on your oven or if you leave them in the fridge or freezer until the oven is ready is up to you, it just affects the baking time. When the oven is hot, put the trays into the oven and bake for 10 minutes. If they are not looking like your preferred cookie consistency, keep them in for another 2-5 minutes. They should be a little bit golden brown. 

Get your helpers out of the kitchen so you can open the oven and remove the trays. We put ours on our stovetop, with oven mitts on the sides closest to the front. Remind your helpers these are HOT and they are to keep their hands off. They will likely repeat this information to you, possibly while reaching out to touch the hot thing if they are a very sensory-seeking child like my 2yo. Keep those little fingers safe.

The next stage is, honestly, my favourite: sprinkling sea salt flakes over the baked cookies. Note that this is not the same as grinding salt over it so make sure your independent oldest child is aware of this and doesn’t accidentally grind pepper over your freshly-baked cookies. Sea. Salt. Flakes. Sprinkle them over, as sparingly or liberally as you wish. Leave the trays there while you deal with children wanting to do painting or needing morning tea or breakfast or whatever you’re up to, then transfer to a wire rack.

In our family, I will put aside a container of these for my husband (usually getting about 8 in a container) so that he actually gets to have some. Whatever remains on the tray after this and children wanting a cookie and then another and maybe a third, goes into our cookie jar. And even though these are, you know, chocolate chip cookies and not known for their health benefits, because they use wholemeal flour and coconut sugar and olive oil, these are cookies I can say “Yes” to when a child wants one for breakfast or in the afternoon and know that it won’t make them any more crazy cuckoo bananas than they would have been otherwise. That’s always nice.

This recipe is from Katie’s Amazing Kitchen and you can find the original recipe here. I have tweaked it only very slightly to suit Australian measurements and our weather and our lunchbox compartment sizes.